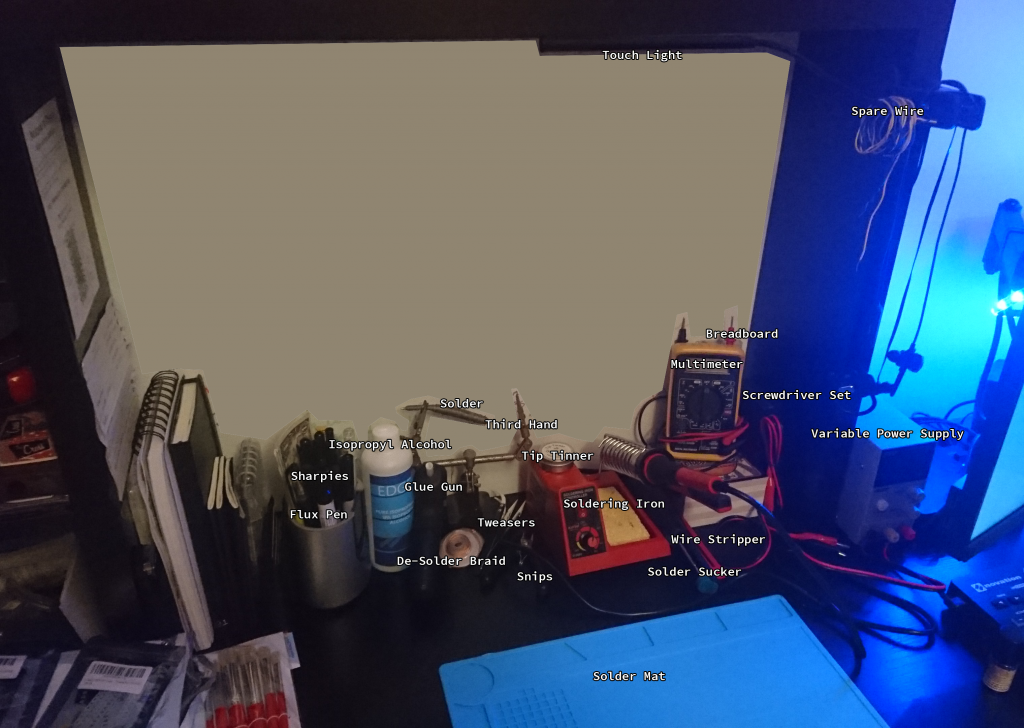
So I know some basic electronics, I’ve fabricated some PCB’s, Built some kits and taken apart many a thing. I would definitely call myself a beginner though! I want this to change. So I have created a little space to play with hardware and electronics and hopefully learn more, build some projects and break some existing things.
This is the little space I’ve created so far, just so you know what I’m working with here, possibly it’ll inspire others to do the same. I’d love to know if there’s anything you think I’m missing or should have done differently.

So I’ll go through what this very basic setup consists of:
Touch Light: Just a small USB LED light that can move around and you touch to turn on/off and dim. Very useful to light the working area.
Spare Wire: Another useful thing, I have 22 AWG single core there (just some old stuff I had lying around) But I would recommend getting some “bodge wire” otherwise known as “Kynar Wire”.
Flux Pen: Not necessary, but super useful! is a magic liquid which makes solder go where it’s supposed to and not where you don’t want it.
Sharpies: I have fine tip sharpies, not needed, but useful for writing on pretty much anything.
Isopropyl Alcohol: Another item thats more of a luxury, good for cleaning PCB’s before use and after as will remove excess flux.
Glue Gun: Pretty self explanatory, sticks thing A to thing B. Good for gluing components inside project case’s for example.
De-Solder Braid: Super useful stuff, it’s basically wire wrapped into a strip that’s coated with flux. If you mess up and put too much solder on a PCB or are trying to remove solder from an existing PCB simply put this on top of the solder, press the iron to it and it’ll wick up the excess solder.
Tweasers: If your dealing with any SMD components these are a must! Preferably with ceramic tips that can withstand the heat of a soldering iron.
Snips: Another must-have, mostly used for trimming the excess leads once a component has been soldered to a PCB.
Solder: Magic electronics glue! use the iron to melt this between components and the PCB.
Third Hand: Good for all sorts, holding wires to tin, holding PCB + components, I would say this is probably a must-have!
Tip Tinner: Not necessary, however very nice to have. Will keep the tip of your iron nice and lasting longer.
Soldering Iron: A must have, the main feature! Hot metal spike used to melt solder and add/remove components to PCB’s
Solder Sucker: Much like De-Solder Braid, this is used to remove excess solder from PCB’s. Push down plunger, heat up solder and press button on solder sucker to suck up the solder. Pretty simple.
Wire Stripper: Not really needed, but nice to have, use this to remove the little bits of plastic from the ends of wires. Alternatively use some scissors, a Stanley knife or your teeth.
Multimeter: This is another must-have. Use this to test continuity between two points on a PCB. Check the current, resistance all sorts of things!
Breadboard: This is only really needed if you plan on doing prototyping. It’s a small board full of holes that you can put components in to test how your circuit works without needing to solder.
Screwdriver Set: If you plan on taking things apart this is pretty invaluable!
Variable Power Supply: This is definitely a luxury item, simply a power supply where you can choose the volts and amps that it sends out. Most things can be powered by a battery, or you can build one of these from an old PSU or there are kits available to purchase.
Solder Mat: Another luxury item, it’s non-slip for using PCB’s on it, it’s heat resistant so the iron wont damage it and it has useful notches for storing components, this particular one has the squares for remembering where screws came from, which is handy.
Well that’s all from this small post. I’m hoping to get some electronics projects done soon and will blog about them. I hope this is useful to someone, perhaps who is starting out and wondering what it really needed to get started with this hobby.
